本文仅用于使用旧版推送集成方案的客户。不适用于使用融云 Push 2.0 集成方案的客户。
同时集成融云和极光的推送,配置会有冲突,主要解决思路,暂时将融云配置相关位置去掉。
本文只标注了gradle 和AndroidManifest.xml 中需要合并修改的位置
如果接入极光推送就不需要重复导入三方推送的jar包,只需要导入jiguang组合包就可以。(只有oppo 厂商 aar 需要单独引入,请将 jiguang/libs 下 com.heytap.msp-push-x.x.x.aar 单独拷贝一份到应用 module/libs 下)。
注意:集成下面步骤前要先把极光组合包集成完成才可以。
以下所有三方推送内容都需要先集成了极光组合包
implementation project(':jiguang')
小米极光组合包
XIAOMI_APPID : "MI-小米appid",XIAOMI_APPKEY : "MI-小米appkey",
在Androidmanifest中添加
 <!-- 小米 配置开始 < -->
 <permission
     android:name="${applicationId}.MIPUSH_RECEIVE"
     android:protectionLevel="signature" />
 <uses-permission android:name="${applicationId}.permission.MIPUSH_RECEIVE" />
 <!-- 小米 配置结束 < -->

 <!-- 小米 配置开始 < -->
<service android:name="com.xiaomi.push.service.XMPushService" android:enabled="true" />
<service android:name="com.xiaomi.mipush.sdk.PushMessageHandler" android:enabled="true" android:exported="true" />
<service android:name="com.xiaomi.mipush.sdk.MessageHandleService" android:enabled="true" />
<!--注:此service必须在2.2.5版本以后(包括2.2.5版本)加入-->

<service
    android:name="com.xiaomi.push.service.XMJobService"
    android:enabled="true"
    android:exported="false"
    android:permission="android.permission.BIND_JOB_SERVICE" />
<!--注:此service必须在3.0.1版本以后(包括3.0.1版本)加入-->

<receiver android:name="com.xiaomi.push.service.receivers.NetworkStatusReceiver" android:exported="true">
    <intent-filter>
        <action android:name="android.net.conn.CONNECTIVITY_CHANGE" />
        <category android:name="android.intent.category.DEFAULT" />
    </intent-filter>
</receiver>
<receiver android:name="com.xiaomi.push.service.receivers.PingReceiver" android:exported="false">
    <intent-filter>
        <action android:name="com.xiaomi.push.PING_TIMER" />
    </intent-filter>
</receiver>
<receiver android:name="io.rong.push.platform.mi.MiMessageReceiver" android:exported="true">
    <intent-filter>
        <action android:name="com.xiaomi.mipush.RECEIVE_MESSAGE" />
    </intent-filter>
    <intent-filter>
        <action android:name="com.xiaomi.mipush.MESSAGE_ARRIVED" />
    </intent-filter>
    <intent-filter>
        <action android:name="com.xiaomi.mipush.ERROR" />
    </intent-filter>
</receiver>
<!-- 小米 配置结束 < -->
如果使用了 proguard,需要在配置文件中加入,可以防止一个误报的 warning 导致无法成功编译,
-dontwarn com.xiaomi.push.**
-keep class com.xiaomi.push.** { *; }
VIVO极光组合包
在Mainfest中添加
<!-- vivo 推送服务需要配置的 service、activity -->
<service
    android:name="com.vivo.push.sdk.service.CommandClientService"
    android:exported="true"/>
<activity
    android:name="com.vivo.push.sdk.LinkProxyClientActivity"
    android:exported="false"
    android:screenOrientation="portrait"
    android:theme="@android:style/Theme.Translucent.NoTitleBar"/>

<!-- vivo push 推送 receiver 声明 -->
<receiver android:name="io.rong.push.platform.vivo.VivoPushMessageReceiver" >
    <intent-filter>
        <!-- 接收 vivo push 消息 -->
        <action android:name="com.vivo.pushclient.action.RECEIVE" />
    </intent-filter>
</receiver>
<meta-data
    android:name="com.vivo.push.api_key"
    android:value="您的api_key"/>
<meta-data
    android:name="com.vivo.push.app_id"
    android:value="您的app_id"/>
注意:vivo推送需要应用上线通过审核才可收到极光测试推送,否则会收不到消息(错误码:10045–应用审核中,不可发送正式消息),或者需要再vivo平台添加测试设备才可收到推送
若需要混淆 app,请在混淆文件中添加以下说明,防止 SDK 内容被二次混淆.
  -dontwarn com.vivo.push.**
  -keep class com.vivo.push.**{*; }
  -keep class com.vivo.vms.**{*; }
OPPO极光组合包
在应用 module gradle 中添加 OPPO 账号配置
  android {
       ......
       defaultConfig {
            applicationId "com.xxx.xxx" //JPush 上注册的包名.
            ......
            manifestPlaceholders = [
                  JPUSH_PKGNAME : applicationId,
                  JPUSH_APPKEY : "你的 Appkey ", //JPush 上注册的包名对应的 Appkey.
                  JPUSH_CHANNEL : "developer-default", //暂时填写默认值即可.

                  OPPO_APPKEY   : "OP-OPPO的APPKEY",
                  OPPO_APPID    : "OP-OPPO的APPID",
                  OPPO_APPSECRET: "OP-OPPO的APPSECRET",
            ]        ......    }    ......}


dependencies {    ......
            // oppo 厂商 aar 需要单独引入
    // 请将 jiguang/libs 下 com.heytap.msp-push-x.x.x.aar 单独拷贝一份到应用 module/libs 下
    implementation(name: 'com.heytap.msp-push-3.1.0', ext: 'aar')
    //以下为 OPPO 3.1.0 aar需要依赖
    implementation 'com.google.code.gson:gson:2.6.2'
    implementation 'commons-codec:commons-codec:1.6'
    implementation 'androidx.annotation:annotation:1.1.0'

    }
如果使用了 proguard,需要在配置文件中加入,可以防止一个误报的 warning 导致无法成功编译
 -dontwarn com.coloros.mcsdk.**
 -keep class com.coloros.mcsdk.** { *; }
 -dontwarn com.heytap.**-keep class com.heytap.** { *; }
 -dontwarn com.mcs.**-keep class com.mcs.** { *; }
注意:接收 OPPO 推送需要用户的 oppo 手机开启应用的通知权限。OPPO推送暂时只支持通知栏消息的推送。消息下发到 OS 系统模块并由系统通知模块展示,在用户点击通知前,不启动应用。OPPO 推送的机型和规则等相关内容请参考 OPPO PUSH FAQ (opens new window)。
魅族极光组合包
1. 需要厂商通道回执配置,需要去魅族官网进行配置,配置成功后给极光发送邮件,参考文档https://docs.jiguang.cn/jpush/client/Android/android_callback/#_4
2. 在项目gradle中添加下最新版本魅族jar依赖,例如:
// 请将 jiguang/libs 下 meizu-push-4.1.4.jar 单独拷贝一份到应用 module/libs 下
implementation files('libs/meizu-push-4.1.4.jar')
在Androidmanifest中添加
<!-- MeiZu 配置开始 < -->
<receiver android:name=".push.MyMZPushReceiver">
    <intent-filter>
        <!-- 接收 push 消息 -->
        <action android:name="com.meizu.flyme.push.intent.MESSAGE"/>
        <!-- 接收 register 消息 -->
        <action
            android:name="com.meizu.flyme.push.intent.REGISTER.FEEDBACK" />
        <!-- 接收 unregister 消息-->
        <action
            android:name="com.meizu.flyme.push.intent.UNREGISTER.FEEDBACK"/>
        <!-- 兼容低版本 Flyme3 推送服务配置 -->
        <action android:name="com.meizu.c2dm.intent.REGISTRATION"/>
        <action android:name="com.meizu.c2dm.intent.RECEIVE" />
        <category android:name="您的包名"/>
    </intent-filter>
</receiver>
         <!-- MeiZu 配置结束 < -->
如果使用了 proguard,需要在配置文件中加入,可以防止一个误报的 warning 导致无法成功编译,
  -dontwarn com.meizu.cloud.**
  -keep class com.meizu.cloud.** { *; }
华为推送组合包
1.添加 Huawei SDK 到项目中
在根级 build.gradle 中添加规则,以纳入 HMS 服务插件 和 华为 的 Maven 代码库,可根据华为开发者联盟发布的版本更新选择最新版本:
  buildscript {
    repositories {
        google()
        jcenter()
        mavenCentral()
        maven { url 'http://developer.huawei.com/repo/'}
    }
    dependencies {
        classpath 'com.huawei.agconnect:agcp:1.6.0.300'
    }
}

allprojects {
    repositories {
        google()
        jcenter()
        mavenCentral()
        maven {url 'http://developer.huawei.com/repo/'}
    }
}
在 app 模块的 build.gradle 添加
dependencies {
    // 接入华为厂商
    implementation 'com.huawei.hms:push:6.7.0.300'
    }
在应用 module 的 build.gradle 文件底部添加 apply plugin 代码行,以启用 gradle 插件:
 // ADD THIS AT THE TOP
 apply plugin: 'com.huawei.agconnect'
2. 配置接收 HMS 消息的服务
对于同一个应用集成了多个推送SDK,且其他SDK也使用了华为通道的用户: 可以将这个极光内置的 Service,换成自己定义的 Service。 这个 Service 继承融云华为的 io.rong.push.platform.hms.HMSPushService 且在每个回调方法,都回调给极光的 PluginHuaweiPlatformsService。类似于这样:
 public class MyHWPushService extends HmsMessageService {
    final PluginHuaweiPlatformsService service = new PluginHuaweiPlatformsService();

    @Override
    public void onNewToken(String s) {
        super.onNewToken(s);
        service.onNewToken(s);
    }

    @Override
    public void onMessageReceived(RemoteMessage remoteMessage) {
        super.onMessageReceived(remoteMessage);
        service.onMessageReceived(remoteMessage);
    }

    @Override
    public void onMessageSent(String s) {
        super.onMessageSent(s);
        service.onMessageSent(s);
    }

    @Override
    public void onSendError(String s, Exception e) {
        super.onSendError(s, e);
        service.onSendError(s,e);
    }

    @Override
    public void onDeletedMessages() {
        super.onDeletedMessages();
        service.onDeletedMessages();
    }
}
<!--华为开始-->
        <service
            android:name=".push.MyHWPushService"
            android:exported="false">
            <intent-filter>
                <action android:name="com.huawei.push.action.MESSAGING_EVENT" />
            </intent-filter>
        </service>
<!--        华为结束-->
3.在build.gradle中配置在华为后台添加的指纹证书对应的签名
注:HMS 服务必须要求 app 签名才能注册成功。指纹证书是在终端采用keytool -list -v -keystore keystorefileName 获取偶对应的指纹证书.
在 project 的 build.gradle 添加 如下内容
signingConfigs {
    release {
        storeFile file("../youmeng.jks")
        storePassword '123456'
        keyAlias 'key0'
        keyPassword '123456'
    }

    debug {
        storeFile file("../youmeng.jks")
        storePassword '123456'
        keyAlias 'key0'
        keyPassword '123456'
    }
}
buildTypes {
    release {
        minifyEnabled false
        proguardFiles getDefaultProguardFile('proguard-android-optimize.txt'), 'proguard-rules.pro'
        signingConfig signingConfigs.release
    }

    release {
        minifyEnabled false
        proguardFiles getDefaultProguardFile('proguard-android-optimize.txt'), 'proguard-rules.pro'
        signingConfig signingConfigs.debug
    }
}
成功集成华为厂商通道的标志
插件集成成功后,会向华为server请求token,拿到这个token即可证明 集成没问题。
token是可以在日志里查到的,观察极光日志输出:
贴图
或者,若集成成功,日志显示如下:
I/JIGUANG-JPush: [HWPushHelper] get huawei token:IQAAAACy0aL1AABEZ3l2C7jluCGX5XriooCvoOwK9TrjG1MTpH0CD47WPXFcAbtt3DdOeOPvX6d7xfAVctoyaOCGKRllRa-0RBP7WQrYI6SxnOp1GA
I/JIGUANG-JPush: [HWPushHelper] isNeedReport:true
D/JIGUANG-JPush: [ActionHelper] doAction:third_action
D/JIGUANG-JPush: [ThirdPushManager] doAction,action:action_register_token,bundle:Bundle[{third_key_action=action_register_token, token=IQAAAACy0aL1AABEZ3l2C7jluCGX5XriooCvoOwK9TrjG1MTpH0CD47WPXFcAbtt3DdOeOPvX6d7xfAVctoyaOCGKRllRa-0RBP7WQrYI6SxnOp1GA, platform=2}],enable:true
I/JIGUANG-JPush: [ThirdPushManager] uploadRegID regid:IQAAAACy0aL1AABEZ3l2C7jluCGX5XriooCvoOwK9TrjG1MTpH0CD47WPXFcAbtt3DdOeOPvX6d7xfAVctoyaOCGKRllRa-0RBP7WQrYI6SxnOp1GA
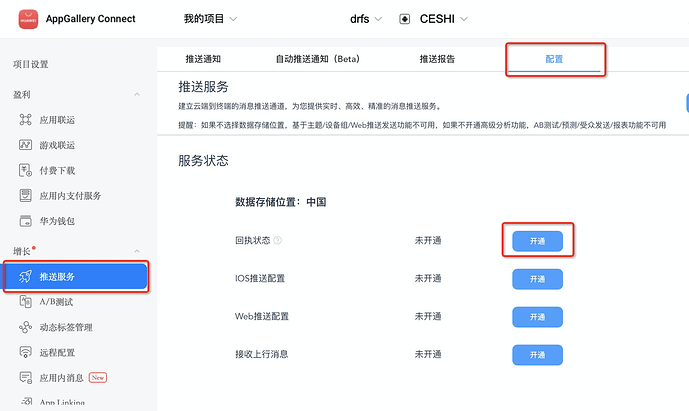
完成华为厂商通道 SDK 集成后,需要开发者在华为开放平台开通并配置消息回执,方可把华为的送达统计等数据回调到极光平台,具体操作如下:* 登录华为AppGallery Connect网站,选择需要开通推送服务的应用,进入应用服务页面
- 左侧导航选择增长-推送服务,在右侧配置页面选择配置-服务状态-回执状态,点击`开通`按钮
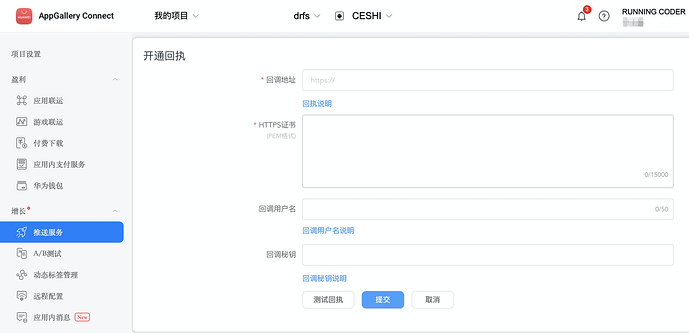
- 华为开通回执功能页面如下,填写相关信息
-
回调地址:可将极光回调地址 https://xpnscb.jpush.cn/v3/hpnsreport
-
HTTPS证书:可以通过命令:openssl s_client -connect xpnscb.jpush.cn:443 -showcerts 来获取证书
说明:
旧回调地址:https://report.jpush.cn/v3/hpnsreport 需尽快切换到新回调地址:https://xpnscb.jpush.cn/v3/hpnsreport
到此小米、vivo、oppo、魅族、华为推送都就集成完成了,特别提醒:一定要仔细检查各个三方推送的appKey、appId、appSecret等参数是否填写正确!!!


